Research Topic
The main topic was to enhance the current existing PNG – Prefilters http://en.wikipedia.org/wiki/Portable_Network_Graphics#Filtering with a new filter which is internally using a Neural Network to create a better prediction which would lead to a better compression.
Compression
Basically the PNG compression is divided in two steps:
- Pre-Compression (Using Predictors)
- Compression (Using DEFLATE)
In this project only the first step is important. In the following illustration you see the current existing prefilters and how the predictors are storing the difference between the predicted pixel and the real pixel.
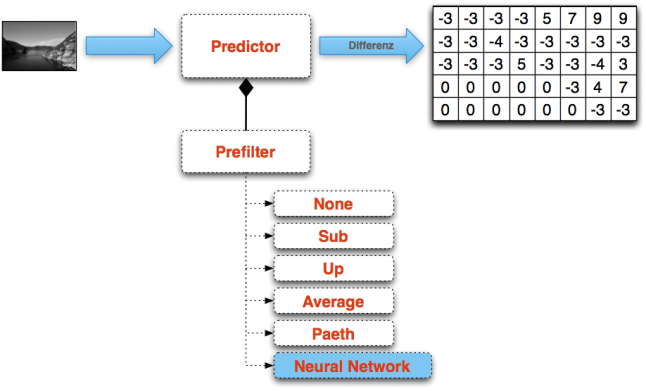
Prefilter enhancement with Neural Network Filter
The current existing filters + the new filter definition:
| Type |
Name |
Filter Function |
Reconstruction Function |
| 0 |
None |
Filt(x) = Orig(x) |
Recon(x) = Filt(x) |
| 1 |
Sub |
Filt(x) = Orig(x) - Orig(a) |
Recon(x) = Filt(x) + Recon(a) |
| 2 |
Up |
Filt(x) = Orig(x) - Orig(b) |
Recon(x) = Filt(x) + Recon(b) |
| 3 |
Average |
Filt(x) = Orig(x) - floor((Orig(a) + Orig(b)) / 2) |
Recon(x) = Filt(x) + floor((Recon(a) + Recon(b)) / 2) |
| 4 |
Paeth |
Filt(x) = Orig(x) - PaethPredictor(Orig(a), Orig(b), Orig(c)) |
Recon(x) = Filt(x) + PaethPredictor(Recon(a), Recon(b), Recon(c)) |
| 5 |
Neural Network |
Filt(x) = Orig(x) - NN(arrayOfInputPixels) |
Recon(x) = Filt(x) + NN(arrayOfInputPixels) |
Neural Network as Predictor
The last filter is my new implementation. It is internally using the Neural Network with an input array of the pixels. As result it returns the predicted pixel value. Like in the other filters the difference between the original value and the predicted value is stored.
But what are exactly these input values I let into the Neural Network Predictor? In the following illustration I try to describe this process of feeding the Neural Network hopefully more clearly.
Basically there are three different parts:
- Copied Pixels (RED)
- Input Pixel (GREEN)
- Predicted Pixel (BLUE)
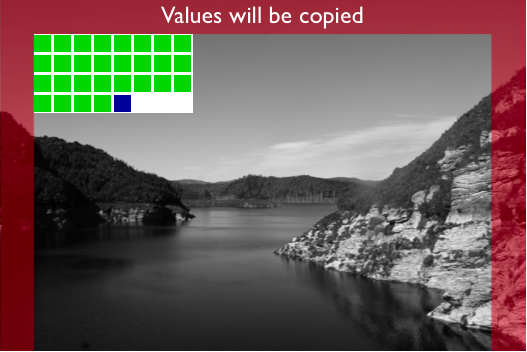
Input values for the Neural Network
Copied Pixels
All the red area will be copied 1:1. My Neural Network Filter is not able to make a prediction out of nowhere. So this is the reason why I have to copy at least the border area of an image. With the current Neural Network layout I am using:
- 28 input neurons (marked green) – 8×4 pixels minus 4 pixels
- 1 output neuron (marked blue) – the 29th pixel
So all the pixels in the height of 1 – 3 pixels will be copied. Same at the width. Every pixel which is in the range from 1 – 3 will be copied.
Input Pixels
The first pixel which can be predicted by the Neural Network Filter is the pixel at the position (4, 4).
This pixel can be calculated by the neural network using as inputes all the 28th pixels from above and from the left. You see this pretty clear in the illustration underneath.
Predicted Pixel
All the green pixels are the input pixels which are passed into the Neural Network and as outcome I should be able to predict the blue input pixel.
Components
In this section I wanna describe the created and used components. Basically all code is written in Java.
As first step we have to train the Neural Network. To make this step a little bit easier I have created a Pattern Exporter which is able to create a training/validation set for the JavaNNS tool. A more detailed explanation is given in the following illustration.
- Training Images:
Images used for training the Neural Network
- Pattern Exporter:
Written in Java it cuts out 8×4 pixel areas and creates a .pat file for the JavaNNS Tool. It creates a traing and validation set which will late be used in the JavaNNS Tool.
- JavaNNS:
Is a OpenSource Java Framework to create and visualize Neural Networks. The training and validation set (.pat) can there be loaded and used for training/validation.
- compression.net:
As soon as you got a nicely trained Neural Network you can save it into a neuralnetwork.net file which I will later use in my Encoder/Decoder.
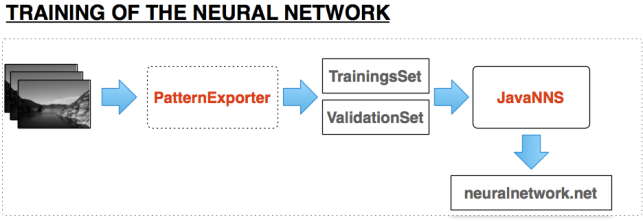
Training of the Neural Network
After finishing the training of the Neural Network we need to use this created neuralnetwork.net file in the Encoder/Decoder. A detailed explanation is also following in the illustration provided underneath.
- Input Images:
The sample image data which is getting compressed by the PNG Neural Network filter
- PNG Encoder/Decoder:
Encoding and Decoding the image with internally using the Neural Network as Predictor
- Neural Network:
I’ve developed in Java to receive a prediction
- JNNSParser:
Is another Java Class which is able to parse an existing neuralnetwork.net file and create out of that a neural network
- Output Images:
As output it should give us compressed images which are smaller than the original images
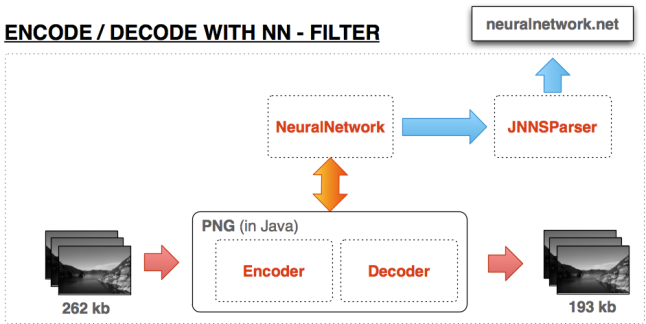
Encode and Decode with the Neural Network Predictor
For Encoding/Decoding im using the library pngj. You can find it here:
http://code.google.com/p/pngj/
Results:
There are many ways to configure the Neural Network:

Neural Network Design
Possible ways to setup the Neural Network
- Amount of Input Neurons
- Layout of the Input Neurons
- Amount of Hidden Neurons
- Amount of Hidden Layers
- Activation Function
- Learning Algorithm
- and so on..
I will provide here some of my evaluated optimal values for the design of the Neural Network. Basically I’ve evaluated them by simply testing it with several image sets and many test rounds and then calculated the bpp (bits per pixel) of the Neural Network set up and determined the best parameters. This brought me to the following result:
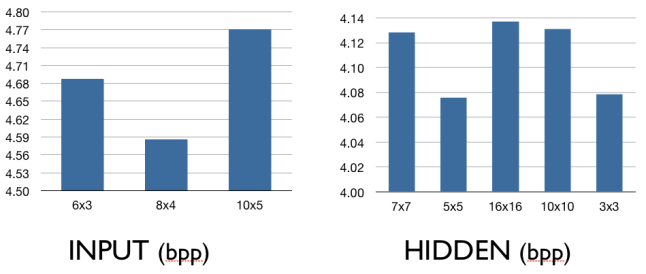
- Evaluating the Neural Network Design
Evaluated Setup of the Neural Network
- Amount of Input Neurons:
28 Input Neurons
- Layout of the Input Neurons
8×4 Layout
- Amount of Hidden Neurons
– 3×3 = 9 Neurons
– 5×5 = 25 Neurons
- Amount of Hidden Layers
1 Hidden Layer
- Activation Function
Sigmoid activation function wich clipped range, transform values into the range of 0.2 to 0.8
- Learning Algorithm
Backpropagation
Comparing with the other existing PNG Filters:
As a next step I’ve compared my Neural Network filter with the other existing PNG Filters (none, up, sub, average and paeth). I did the test with several images sets (containing artificial images or containing natural images). Underneath you see a benchmark of the average bpp (bits per pixel) of the 26 images.
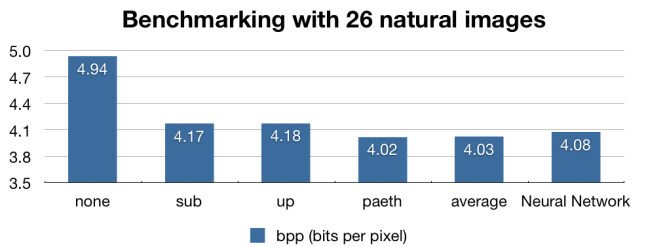
Benchmark with other PNG filters
You can see that my Neural Network Filter is compression slightly worse than the paeth and average filter. But it is much better than the up and the sub filter. After this benchmark I did another one with a bigger image set of 111 natural images. I wanted to know on which pictures my Filter is good and on which filter it is bad.
Here are some pictures I am compressing better than all the other filters:
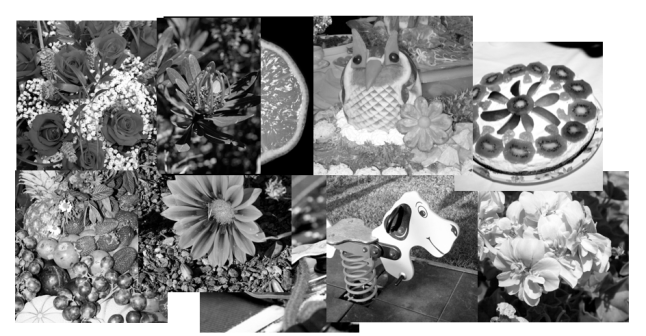
- Picture the Neural Network is compressing better
I wasnt sure what these picture have in common. Well there are many flowers. So possibly my Neural Network really likes Flowers. But I wasn’t very comfortable with that explanation :). So my other conclusion was that my neural network is especially good when the picture contains the following characteristics:
- A lot of textures
- Different structures
- Not a lot of noise
As a next step I have looked through my holiday pictures to find a picture with the named characteristics and I run the test again. I came to the following result:
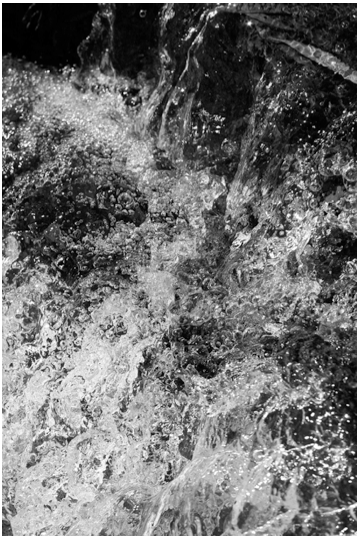
- Waterfall (Picture NN should compress good)
As result I got the following bpps form the 6 Filters:
Filter: None => 7.289
Filter: Sub => 6.681
Filter: Up => 6.667
Filter: Average => 6.433
Filter: Paeth => 6.486
Filter: NN => 6.368
So my these about the textured, structured pictured was somehow confirmed. How you see in the results my Neural Network had the best compression rate.
Comparison of natural and artificial images
Another benchmark I wanted to do was using different training/validation images for training the network and check the impact on compression a set of natural or artificial images. In the following illustration you can see the results:
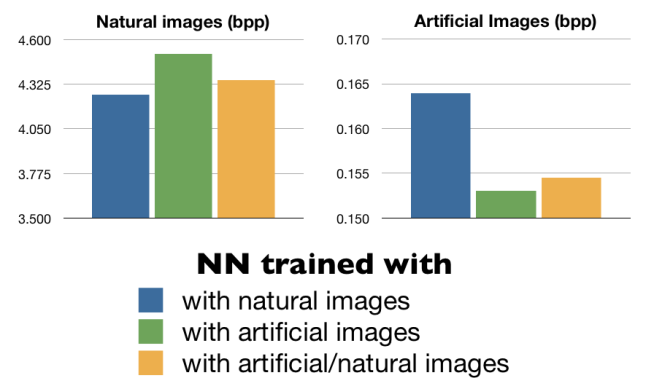
Comparison natural vs artificial
Conclusion:
- There is a lot of potential. I didn’t have a lot of time to find the perfect set up for the Neural Network. Maybe If you would specialize on determining the perfect setup you could maybe get results where the Neural Network Filter is beating all other filters on the average benchmark
- Maybe also using a total different structure of the Neural Network would maybe bring an improvement. I was thinking on recursive Neural Networks…
- Another option would be using the Neural Network Filter for a specific type of images and train the Network only which this type of images.
- Performance wasn’t a point I’ve worked on. It is clear that the other filters are performing much much faster than my solution.
The project is now under git hub. Have a look:


