Research Topic
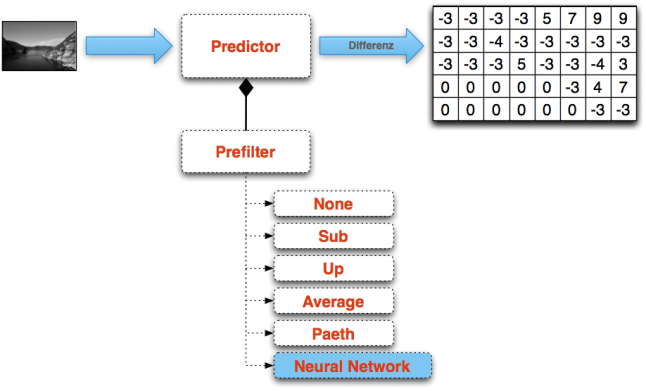
The main topic was to enhance the current existing PNG – Prefilters http://en.wikipedia.org/wiki/Portable_Network_Graphics#Filtering with a new filter which is internally using a Neural Network to create a better prediction which would lead to a better compression.
Compression
Basically the PNG compression is divided in two steps:
- Pre-Compression (Using Predictors)
- Compression (Using DEFLATE)
The current existing filters + the new filter definition:
| Type | Name | Filter Function | Reconstruction Function |
|---|---|---|---|
| 0 | None | Filt(x) = Orig(x) | Recon(x) = Filt(x) |
| 1 | Sub | Filt(x) = Orig(x) - Orig(a) | Recon(x) = Filt(x) + Recon(a) |
| 2 | Up | Filt(x) = Orig(x) - Orig(b) | Recon(x) = Filt(x) + Recon(b) |
| 3 | Average | Filt(x) = Orig(x) - floor((Orig(a) + Orig(b)) / 2) | Recon(x) = Filt(x) + floor((Recon(a) + Recon(b)) / 2) |
| 4 | Paeth | Filt(x) = Orig(x) - PaethPredictor(Orig(a), Orig(b), Orig(c)) | Recon(x) = Filt(x) + PaethPredictor(Recon(a), Recon(b), Recon(c)) |
| 5 | Neural Network | Filt(x) = Orig(x) - NN(arrayOfInputPixels) | Recon(x) = Filt(x) + NN(arrayOfInputPixels) |
Neural Network as Predictor
The last filter is my new implementation. It is internally using the Neural Network with an input array of the pixels. As result it returns the predicted pixel value. Like in the other filters the difference between the original value and the predicted value is stored.
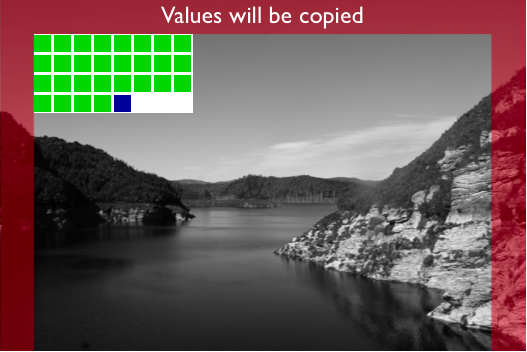
But what are exactly these input values I let into the Neural Network Predictor? In the following illustration I try to describe this process of feeding the Neural Network hopefully more clearly.
Basically there are three different parts:
- Copied Pixels (RED)
- Input Pixel (GREEN)
- Predicted Pixel (BLUE)
Copied Pixels
All the red area will be copied 1:1. My Neural Network Filter is not able to make a prediction out of nowhere. So this is the reason why I have to copy at least the border area of an image. With the current Neural Network layout I am using:
- 28 input neurons (marked green) – 8×4 pixels minus 4 pixels
- 1 output neuron (marked blue) – the 29th pixel
Components
In this section I wanna describe the created and used components. Basically all code is written in Java.
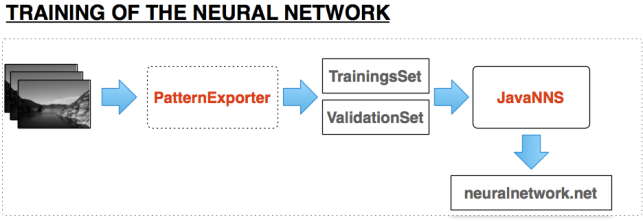
As first step we have to train the Neural Network. To make this step a little bit easier I have created a Pattern Exporter which is able to create a training/validation set for the JavaNNS tool. A more detailed explanation is given in the following illustration.
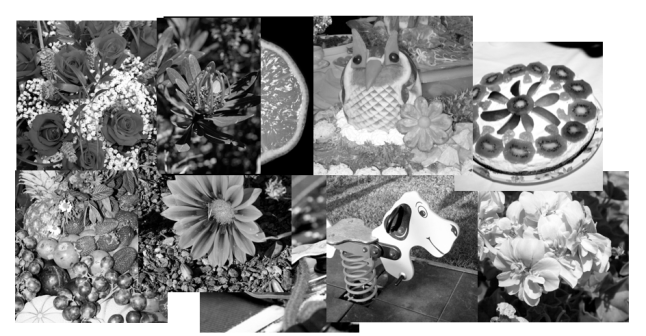
- Training Images:
Images used for training the Neural Network - Pattern Exporter:
Written in Java it cuts out 8×4 pixel areas and creates a .pat file for the JavaNNS Tool. It creates a traing and validation set which will late be used in the JavaNNS Tool. - JavaNNS:
Is a OpenSource Java Framework to create and visualize Neural Networks. The training and validation set (.pat) can there be loaded and used for training/validation. - compression.net:
As soon as you got a nicely trained Neural Network you can save it into a neuralnetwork.net file which I will later use in my Encoder/Decoder.
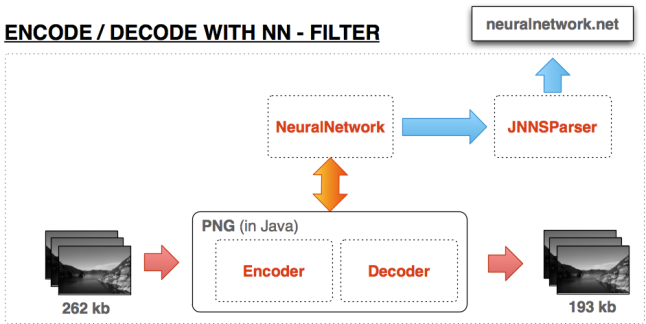
After finishing the training of the Neural Network we need to use this created neuralnetwork.net file in the Encoder/Decoder. A detailed explanation is also following in the illustration provided underneath.
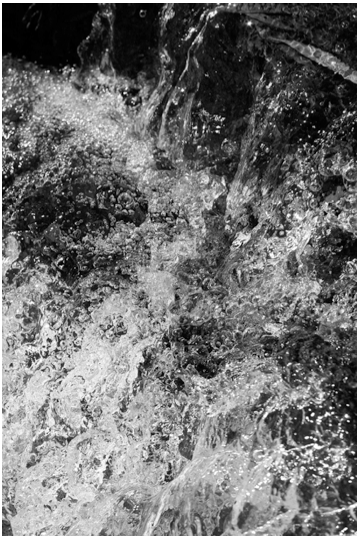
- Input Images:
The sample image data which is getting compressed by the PNG Neural Network filter - PNG Encoder/Decoder:
Encoding and Decoding the image with internally using the Neural Network as Predictor - Neural Network:
I’ve developed in Java to receive a prediction - JNNSParser:
Is another Java Class which is able to parse an existing neuralnetwork.net file and create out of that a neural network - Output Images:
As output it should give us compressed images which are smaller than the original images
For Encoding/Decoding im using the library pngj. You can find it here:
http://code.google.com/p/pngj/
Results:
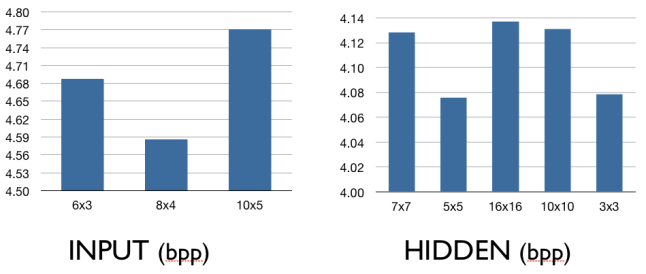
There are many ways to configure the Neural Network:
Possible ways to setup the Neural Network
- Amount of Input Neurons
- Layout of the Input Neurons
- Amount of Hidden Neurons
- Amount of Hidden Layers
- Activation Function
- Learning Algorithm
- and so on..
- Amount of Input Neurons:
28 Input Neurons - Layout of the Input Neurons
8×4 Layout - Amount of Hidden Neurons
– 3×3 = 9 Neurons
– 5×5 = 25 Neurons - Amount of Hidden Layers
1 Hidden Layer - Activation Function
Sigmoid activation function wich clipped range, transform values into the range of 0.2 to 0.8 - Learning Algorithm
Backpropagation
- A lot of textures
- Different structures
- Not a lot of noise
Filter: None => 7.289
Filter: Sub => 6.681
Filter: Up => 6.667
Filter: Average => 6.433
Filter: Paeth => 6.486
Filter: NN => 6.368
So my these about the textured, structured pictured was somehow confirmed. How you see in the results my Neural Network had the best compression rate.
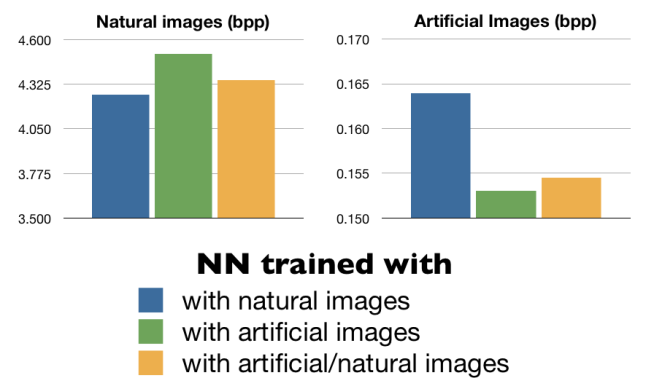
Comparison of natural and artificial images
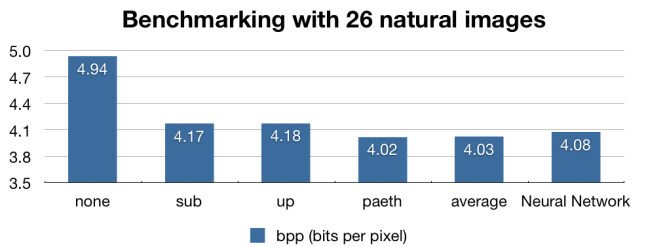
Another benchmark I wanted to do was using different training/validation images for training the network and check the impact on compression a set of natural or artificial images. In the following illustration you can see the results:
Conclusion:
- There is a lot of potential. I didn’t have a lot of time to find the perfect set up for the Neural Network. Maybe If you would specialize on determining the perfect setup you could maybe get results where the Neural Network Filter is beating all other filters on the average benchmark
- Maybe also using a total different structure of the Neural Network would maybe bring an improvement. I was thinking on recursive Neural Networks…
- Another option would be using the Neural Network Filter for a specific type of images and train the Network only which this type of images.
- Performance wasn’t a point I’ve worked on. It is clear that the other filters are performing much much faster than my solution.

Hello Prine,
I hope that you are still maintaining this blog. I am a second year student at Murdoch university and am using JNNS for an image processing application similar to this. I am curious as to how you managed to export the images as a pattern, are you able to share this?
Thanks,
Luke
Hi Luke
Yes I am still maintaining this blog. Murdoch University in Perth? Because I did there my exchange semester :). Do you have to do this project in the 219 – Intelligent Systems Course? Because I also did this course.. Funny how small the world is..
So im currently uploading all my project files on a git hub. You can see the data here:
https://github.com/prine/PNGNN
Should be up in the next minutes.. If you have any questions do not hesitate to contact me!
You probably also could use the JNNSParser and the Neural Network it is generating out of it.
Have fun!
Cheers
Prine
Precisely that university… and precisely that course! A small world indeed!
Many thanks again for your resources and help. Unfortunately, I have only now been able to access your code due to other assignments, so I must ’shortcut‘ a little and ask you some questions concerning it. As I wish to import a group of images and then export them into a pattern set for JNNS, do I also need to use your PNG encoder? Or can I simply save my test images as PNG and then use your ‚exporter‘ program to create the pattern?
Thank you for your patience,
Luke
No if you only want to export them for JNNS you don’t need to use PNG Decoder/Encoder..
If you dont want to crop out small pieces of the image, then just set the sizeX and sizeY to the size of the current used image. And if you dont want to have the images more than once exported, set the variable AMOUNT_OF_SUB_IMAGES to 1. (Because of my project task I had to get a lot of small pieces of the image, thats why the exporter was programmed like that..)
IMAGE_PATH is the path to the folder which contains all the images
OUTPUT_FILE the filename of the generated pattern.
Hope this will help you!
What is your project about?
Ah, cool, thanks heaps. I’ll get on to that, and I’m sure I shouldn’t have too much trouble until I reach the JNNS part. But first, some background.
My aim with the project is based on an issue in the prisons system, where prisoners are not unlocked at the right time. So what I am doing is emulating something similar by taking photos of my hallway – sometimes with a person in there, sometimes a door open, etc. – and then I want to put them into JNNS and tell it which scenes represent unlock time, etc. I hope that makes sense 🙂 any tips on that second part would also be useful, as JNNS doesn’t have very thorough documentation. Essentially I just need to know how to categorise an image to use as a ‚base‘.